Company Holidays allow Admins to create and manage time-off entries for local holidays, national holidays, and company-wide events. These holidays can be applied to everyone in your organization or limited to specific Employment Types. Once created, holidays are automatically added to timesheets, and the resulting entries can be managed in bulk from the Leave Type Detail page.
Note: Access to the Leave Types section, including the ability to add or edit Leave Types, requires Administrative access.
ClickTime provides core time off features for all organizations, with additional management tools available on the Team plan or higher.
Limitations
- DCAA Compliance: Company Holidays are not supported for organizations with DCAA Compliance enabled.
- QuickBooks Connector: Company Holidays are not currently exported via the ClickTime Connector for QuickBooks.
You can jump directly to a section of this guide:
Adding Company Holidays
Company Holiday List
Editing your Company Holiday List
Leave Type Availability for Company Holidays
Company Holiday Timesheet Entries
Editing Company Holiday Timesheet Entries for One Person
Editing Company Holiday Timesheet Entries for All People
Deleting Company Holiday Timesheet Entries for All People
Creating and Editing People
Summary
Adding Company Holidays
Accessing the Leave Types List View page:
- Go to Company > Preferences.
- Select Leave Types near the top of the page.
To create a Company Holiday, click Add Leave Type in the upper-right corner of the Leave Types List View page.
On the next page, you’ll set up the Basic Information for the new Leave Type. Be sure to select Company Holiday as the Category.
Click Create Leave Type to go to the Company Holidays tab. This is where you can start creating holidays that will be added directly to Timesheets.
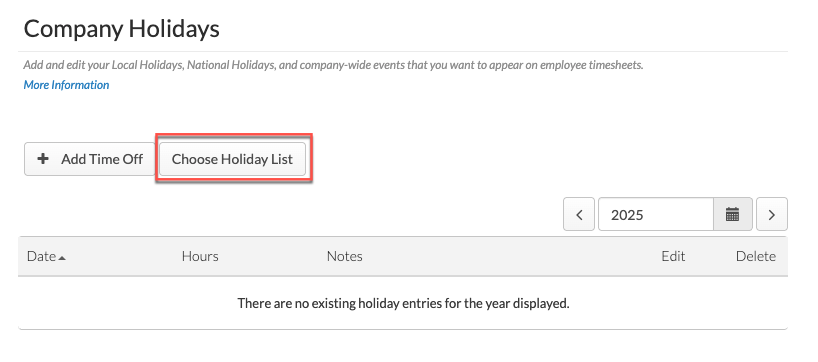
Company Holiday List
On the Company Holidays tab, you can:
- Manually add holidays to your Company Holiday list, or
- Choose from ClickTime’s pre-set holiday lists, which automatically populate your Company Holiday Leave Type with a standardized set of holidays for a specific locale and year.
Manually Adding Holidays
To manually add a holiday — or include additional dates beyond a pre-set list (for example, Day After Thanksgiving):
-
Click + Add Time Off at the top of the list.
- Select a date, enter the number of hours, and (optionally) add notes. We recommend including the holiday name in the Notes field.
-
Click Add to Timesheets when ready.
ClickTime will immediately add time entries for this holiday to all available timesheets. These entries will appear as locked time entries for employees who have access to the Leave Type.
Using a Pre-Set Holiday List
Pre-set lists provide a quick way to add multiple holidays to employee timesheets at once.
- From the Choose a List menu, select the holiday list you’d like to apply.
- Select the year (defaults to the current year; you can also choose up to two years in the future).
-
Click Use this Holiday List. The holidays will populate your Company Holiday Leave Type.
Supported Holiday Lists:
- Australian Stock Exchange
- Canada Statutory Holidays
- London Stock Exchange
- New York Stock Exchange
- Toronto Stock Exchange
- U.S. Bank Holidays
Notes:
- Holidays from a pre-set list will not be added if they conflict with an existing holiday in that Leave Type. Additionally, holidays dated prior to your company’s start date will not be added.
- Inactive people will not receive Company Holidays. Locked, submitted, or approved timesheets will also not receive new holiday entries.
Editing Holiday Entries
Whether you add holidays manually or use a pre-set list, you can edit each entry to fit your organization’s needs. For each holiday, you can update the date, number of hours, and notes.
Editing your Company Holidays List
As you start a new calendar year, ClickTime suggests two ways to manage your holiday lists:
Option 1: Repurpose Your Existing List
If your holiday schedule remains fairly consistent from year to year, you can repurpose your existing Company Holiday list instead of creating a new one. This option keeps everything in one place while allowing you to roll forward into the new year.
-
Update the Holiday List Name
First, make sure the Company Holiday Leave Type Name reflects the current year. We strongly recommend including the year in the name (e.g., Company Holidays 2025). This makes it easy to identify and avoids confusion later when you’re reviewing historical records. -
Navigate to the New Year
Open the existing holiday list and use the Calendar icon in the top-right to move forward to the upcoming year. This ensures you’re adding entries to the correct year.
-
Add Holidays
From here, you can add holidays for the new year in whichever way works best for your organization:
- Manually add holidays one at a time using the + Add Time Off button.
- Choose a pre-set holiday list to quickly populate standard holidays for your region or locale.
-
Or, use a combination of both (e.g., start with a standard list, then add unique company-specific days like “Day After Thanksgiving”).
All holidays you add will automatically populate for the selected year and appear as locked entries on employee timesheets once they’re added.
Option 2: Inactivate Older Lists and Create a New One
Another approach is to inactivate your existing holiday list and set up a new one:
- Mark the prior Company Holiday Leave Type as Inactive.
- Create a new Company Holiday Leave Type for the new year.
- Add holidays manually or choose a pre-set list.
This option is best if you want to preserve historical data for reporting or if your holiday schedule changes significantly each year.
Leave Type Availability for Company Holidays
If you have multiple Employment Types in ClickTime that earn holiday time — but the hours differ by group — we recommend creating separate Company Holiday Leave Types for each Employment Type. For example:
- Full-Time Employees may earn 8 hours.
- Part-Time Employees may earn 4 hours.
Creating Multiple Holiday Lists
To support these scenarios:
- Create a dedicated Company Holiday Leave Type for each Employment Type.
- Include the year and group in the name for clarity (e.g., Company Holidays 2025 – Full-Time Employees, Company Holidays 2025 – Part-Time Employees).
Tip: Clear labeling makes it easier to manage holiday lists year after year.
Enabling Leave Type Controls
To assign holidays by Employment Type, Leave Type List Controls must be enabled:
- Go to Company > Preferences.
- Scroll to Time Entry Controls.
-
Enable Leave Type Controls (Administrator access required).
Assigning Availability
Once Leave Type Controls are enabled:
- Navigate to the existing Company Holiday Leave Type.
- Click Edit.
-
Select the Leave Type Availability tab.
-
Assign which Employment Types should have access to that holiday list.
This ensures that each group receives the correct number of holiday hours for their Employment Type.
Notes:
- Employees must be assigned to an Employment Type that has access to the Company Holiday Leave Type. They will only receive holiday entries available to their group, and only if their timesheets are in open or rejected status.
- If Leave Type restrictions are enabled, you must set availability before entering holiday dates. If no Leave Type is selected, holiday entries will not be added to timesheets until availability is defined.
Company Holiday Timesheet Entries
ClickTime will add time-off entries to employee timesheets as soon as you click Add to Timesheets or Use this Holiday List. Entries are added to all open timesheets for active people, except in the following cases:
- Timesheets that have been submitted, locked, or approved
- Timesheets belonging to inactive people
- Dates outside a person’s Start or End Date
Note: It may take several minutes for entries to appear on all timesheets. If you don’t see them immediately, check again after a few minutes.
Company Holiday entries display as locked entries on timesheets. Below is an example of a Company Holiday entry on the Day View page:
Editing Company Holiday Timesheet Entries for One Person
Admins and Managers with Timesheet Override permissions can adjust holiday entries for specific employees.
With Override, you can:
- Delete an entry
- Edit hours
- Edit notes
To edit:
- Go to Company > Timesheets.
- Click Override Timesheets.
- Select the employee and date.
- Delete or edit the entry.
Note: If you re-add the holiday from the Company Holiday Leave Type and click Update, the entry will repopulate for all eligible employees without duplicates.
Editing Company Holiday Timesheet Entries for All People
Changes made on the Company Holiday Details page automatically update entries on all open timesheets, making it easy to manage holidays across the organization.
- Editing a holiday entry updates all open timesheets for active people — even if an entry was previously modified using Override.
- Inactivating a Company Holiday Leave Type does not change existing timesheets but prevents new employees from receiving holidays associated with that Leave Type.
- Deleting a holiday entry removes it from all open timesheets for active people.
Posting Holidays to Missed Timesheets
If a holiday was not applied to an employee’s timesheet when the Company Holiday was first created (for example, if the timesheet was already approved):
- Reopen or reject the timesheet.
- Update the Company Holiday entry on the Leave Type page.
This will add the holiday to the employee’s timesheet, which can then be re-approved.
Deleting Company Holidays for All People
If a holiday was created incorrectly or during testing, you can bulk delete it:
- Go to the Company Holiday Details page.
- Select the holiday.
- Click Delete.
This removes the entry from all open timesheets for active employees.
Note: Scheduled Company Holidays can only be edited or deleted while their Company Holiday Leave Type is Active. If the Leave Type is Inactive, the Delete option will not be available, and you will see the message "Edits to scheduled company holidays can only be made against active Company Holiday Leave Types."
If the Company Holiday Leave Type is Inactive
If the Leave Type is Inactive, you have two options for removing the holiday entries:
- Reactivate, delete, then inactivate again. Set the Company Holiday Leave Type back to Active, delete the holiday from the Company Holiday Details page using the steps above, then set the Leave Type to Inactive again. Inactivating a Company Holiday Leave Type does not change existing timesheets, so the entries you delete will not return.
- Remove entries per person with Override. If you prefer not to reactivate the Leave Type, go to Company > Timesheets, click Override Timesheets, select the employee and date, and delete the entry. Repeat for each affected employee.
Important: Submitted or approved timesheets must be reopened before bulk deletion can occur. Otherwise, entries must be manually removed after reopening.
Creating and Editing People
When new people are added, Company Holiday entries are automatically added to their timesheets if:
-
-
The holiday date falls between their Start and End Dates.
- No dates = all holidays (including prior years).
- One date = entries respect that boundary.
-
The holiday date falls between their Start and End Dates.
Recommendation: Always enter a Start Date if using Company Holidays.
-
-
Leave Type List Controls are enabled, and their Employment Type has access.
- Changing Employment Type applies new holidays going forward. Old ones do not transfer.
- Holidays on submitted/approved timesheets remain but can be removed with Override.
-
Leave Type List Controls are enabled, and their Employment Type has access.
Notes:
- Inactive people will not receive holidays.
- Locked/submitted/approved timesheets will not receive new entries.
Summary
Company Holidays give administrators an efficient way to manage organization-wide or Employment-Type–specific time-off entries. By creating dedicated Company Holiday Leave Types, you can bulk apply holidays manually or from pre-set lists, ensuring consistent and accurate time tracking.
Admins can:
- Repurpose or create new holiday lists each year.
- Assign different holidays or hours to specific Employment Types.
- Edit or delete entries in bulk or adjust them individually with Override.
This feature streamlines holiday management, reduces manual work, and ensures employee timesheets remain accurate across the organization.
Comments
0 comments
Article is closed for comments.