This guide will cover how to use the data link you generate from a Customizable Data Export with the different versions of Excel. Data Linking starts with the Customizable Data Export Report - general information on using that report is available in the Customizable Data Export Overview Guide here. For assistance generating a data link, please see the Data Linking Overview guide here.
Notes About XML Linking
Importing Your XML Link
Import Instructions for Microsoft Excel 365
Import Instructions for Excel 2013 or 2016
Import Instructions for Excel 2010
Please Be Aware of the Following:
- The Mac-based version of Excel was not designed to support data linking.
- Only one link to ClickTime can be established per workbook.
- Due to a current Microsoft issues, you will want to save files in .xls format (instead of .xlsx format) if you need to refresh a worksheet with updated data. If you need to save this file in .xlsx format, please contact ClickTime Support and we can provide you with another method to populate your worksheet that can be saved in .xlsx and refreshed as needed.
Some customers have also asked about using XML linking when their local network is behind a firewall. There should not be any issues with using the XML linking process behind a firewall, as ClickTime does not push data to the file directly. Excel pulls the data from ClickTime via port 443 (a standard HTTPS web protocol) when the end-user opens and uses the Excel file - if you are experiencing issues you believe are related to your firewall, please check with your local network Administrator for assistance. This guide has more information about optimal settings for working with ClickTime and may also be a helpful resource.
After making sure you have the appropriate "Legacy" XML Linking options enabled (explained below), please make you have done the following before using the XML link that ClickTime provides:
- Created a Customizable Data Export with a saved name:
- Ran the report to make sure that the criteria used is the most up-to-date
- You can then copy/paste this XML link from the page confirming the report has finished running:
- You can then periodically refresh your worksheet using the "Refresh All" option on the data tab:
A few things to note:
- If you make any changes to your date range that should be reflected in your worksheet, you will need to re-run the Customizable Data Export before refreshing your Excel worksheet.
- If you add columns to a saved report, rerunning the report and refreshing your worksheet will not pick up those additional columns. You will need to start the import with a new blank worksheet in order for the new columns to be included.
- If you remove columns from a saved report, rerunning the report and refreshing your worksheet will not successfully remove those columns, but no data should remain in the fields.
Reminder: By default, data will only be exported for the date range you specified in the report criteria. However, you can also override this date range via the custom URL configuration parameters StartDate and EndDate, as detailed in the Data Linking Overview guide here.
Data Import Instructions for Excel Microsoft 365
The below options for Excel 2013/2016 may work for you, but if you have difficulty, you may also be able to use the generic "From XML" data linking option available in recent version of Excel.
To add this to your Excel options:
- Go to File --> Options --> "Customize Ribbon"
- Change the "Choose commands" drop-down to "All Commands"
- Find the "From XML Data Import (Legacy)" option in the list
- Add a new "Group" to your Ribbon:
- Name your new Group (optional)
- Use the "Add" option to move the "From XML" command to the new Group
- Click "OK
Some customers have also reported that additional steps may need to be taken when using Office 365. Specifically, they may need to go to the File --> Options screen and choose the "Data" section. From there, enable the "From XML Data Import (Legacy)" option:
They should then see an additional Legacy option in the "Get Data" drop-down, which includes the "From XML Data Import (Legacy)" choice.
PLEASE NOTE: if the XML linking process is still not working after trying the (Office 365) instructions above, please refer to our "Troubleshooting" section below (see here)
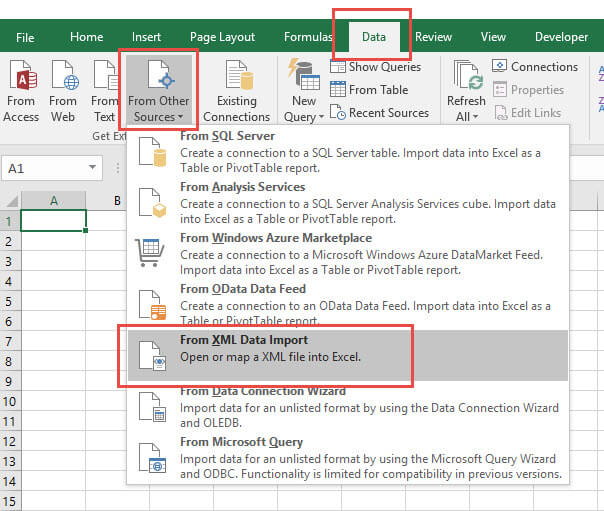
Data Import Instructions for Excel 2013 and 2016
- Open an Excel workbook.
- Go to a blank worksheet.
- Go to the Data tab and then choose "From Other Sources" and choose "From XML Data Import" (as shown in the screenshot below).
- In the pop-up dialog box that opens you will be asked to select the file that you want to import.
- Instead of searching for a file on your local computer, paste the URL you copied from ClickTime into the "File Name" field.
- Click Open. Excel will then ask where you want to put the data. Make the appropriate choice and click "OK".
- Your data will be successfully imported into your Excel Sheet. Save your Excel spreadsheet.
- To update data in the sheet with fresh new data from your ClickTime account, go to the Data tab and choose to "Refresh All". Please make sure to save your file in .xls format in order to Refresh Data
Data Import Instructions for Excel 2010
- Open an Excel workbook.
- Go to a blank worksheet.
- Go to the Developer tab (as shown in the screenshot below).
- In the popup dialog box that opens you will be asked to select the file that you want to import.
- Instead of searching for a file on your local computer, paste the URL you copied from ClickTime into the "File Name" field.
- Click Open. Excel will then ask where you want to put the data. Make the appropriate choice and click "OK".
- Your data will be successfully imported into your Excel Sheet. Save your Excel spreadsheet.
- To update data in the sheet with fresh new data from your ClickTime account, go to the Developer tools and choose to "Refresh Data".

Troubleshooting:
ISSUE: Cannot import to Excel (Office 365)
SOLUTION: after following the "Data Import Instructions for Excel Microsoft 365" above, try these additional steps:
- Run the Customizable Data Export and copy the XML link here
- Refer to the import steps here
- Paste in the XML link here and click 'open'
- Click the arrow here to select the content body
- Click 'import' here
- Paste into 'existing worksheet' here and click OK
- You will see a table that looks like this
- Click "From table range" here : NOTE: your options/icons may differ slightly
- You'll end up in an editor window that looks like this . NOTE: the top row headers populate the first row of data. Do not remove these headers.
- Click on 'Use first row as headers' here
- Now you can double-click into each cell and edit each column header to rename them to what you want. For example: "Clients", "Projects", etc.: see here
- NOTE: if you see this extra column called "/row/hours/#agg", just ignore it for now. This gets pulled into the report in some cases, but you can delete this column later when the report is finalized. ALSO: if you see certain cells with "null" values, don't be alarmed.....it just means there was no data in that part of the report. See here
- Once you've edited all the column header names, click "Close & Load" here
- Now you'll send up with a report that looks like this
- Delete the extra column here
Comments
0 comments
Article is closed for comments.